High Pressure Laminates: What They Are and How They’re Used
November 22, 2022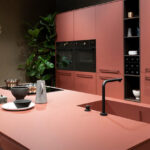
The Fenix Cleaning Tips
December 9, 2022
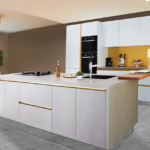
Laminates are a popular surface-finishing material for home interiors, including furniture and walls. A versatile material, laminate is preferred over other finishing materials owing to its classy appearance, quality, and affordability. Laminate finds its application in corporate, residential, and other commercial spaces. So, if you are considering laminate for your next kitchen cabinet design project, you have countless options in terms of colors and patterns. Here is a detailed look at laminates and what makes them a sought-after material by homeowners.
Tips for Laminating Your Kitchen Cabinets
To protect your kitchen cabinets from the everyday wear and tear of use, consider laminating them. Here are four tips for getting the best results:
- Choose a compatible adhesive
There are several different types of adhesives available, but they all work best if they are used in conjunction with one another. For example, if you’re using an acid-free adhesive, you’ll need to use an alkali-free adhesive to make sure the finished product is resistant to moisture absorption.
- Preparing the cabinets
Remove all unnecessary hardware and clean the cabinet surfaces with a cleaner and a cloth. Dry the surface with a clean cloth.
- Choosing the right lamination film
There are two main types of lamination sheets available in the market, direct contact and transfer film. Direct contact films are made to attach directly onto the cabinet surface, while transfer films are designed to be placed over an adhesive sheet and then adhered to the cabinet surface.
- Preparing the adhesive sheet
First, determine which type of adhesive sheet you will need. If you are using direct contact film, you will need an outdoor grade film adhesive. If using transfer film, you will need an indoor grade film adhesive. Place the desired amount of adhesive onto a piece of paper that is larger than your cabinet surface (at least twice as large).
- Applying the adhesive
Make sure that your cabinets and surface are clean and dry. Peel off the protective liner from the adhesive sheet. Apply one half of the adhesive to one side of your cabinet surface (keeping in mind that your cabinet is twice as large as your adhesive). Position your cabinet so that the opposite side of the adhesive meets up with it perfectly. Press down firmly to ensure adhesion. Repeat on the other side.
- Trim your cabinet doors before lamination begins.
Laminating tends to adhere better to straight edges than curved ones, so it’s important to be careful when trimming your cabinet doors before starting the lamination process. If they’re too short or too long, they may cause problems during the etching or cutting of the lamination film later on.
If you’re looking for ways to keep your cabinets looking their best, these tips are definitely worth considering. Not only will laminating your cabinets help them look newer for longer, but it’ll also protect them from moisture and damage. Give these tips a try and see how much easier it becomes to keep your kitchen looking great! For more details, you must consider formica laminates.